

I have redone a contact paper countertop twice in my life. The first time, the paper peeled up at the back corner inside of three weeks. The second time, it has held up for nine months under a sink that drips, a coffee pot that lives on the counter, and a roommate who puts hot pans down without thinking. This is the version of the process I wish I'd had the first time — the mistakes that cost me both time and money, and the eight steps that ended up holding.
Most contact paper guides assume you're doing this to a perfect, empty counter in a perfect kitchen. That is not the reality of a rental. Your counter has a weird seam by the stove, one corner that lifts because the substrate is swelling, and a landlord who told you not to touch the surface. Everything below is built for that reality.
Why contact paper works for a renter countertop
If you cannot replace your countertop, you basically have four options that do not require a contractor or a deposit you will not get back. Paint works on some surfaces but chips within months on laminate. Peel and stick tiles look great in a photo and lift at every grout line in real life. Stick-on veneers exist but they trap moisture and the edges never sit flat. Contact paper is the cheapest, fastest, and easiest to reverse when you move out. If your landlord comes by, you can peel the whole sheet off in about an hour and there is nothing left behind except maybe a faint adhesive shadow that wipes off with Goo Gone.
The second reason is variety. When I ordered my first roll, I thought "marble or nothing." That is wrong. There are convincing butcher block patterns, warm oak patterns, matte concrete patterns, terrazzo, and even a handful of solid matte colors that look like a real honed slab if you pick the right shade. The third reason is cost. I did my whole kitchen for under sixty dollars in materials the second time. The first time I spent about forty because I kept buying the wrong supplies.
The three mistakes I made the first time
The first time I did this, I made every mistake there is. I want them on the record so you can skip them.
Mistake one: I bought glossy contact paper for a kitchen. Glossy finish shows every fingerprint, every water spot, every crumb. The paper looked gorgeous for the first afternoon and awful by the second morning. The matte or satin finishes hide day-to-day wear. If you can only find glossy in the pattern you want, you can knock the shine down with a very fine sanding pad after install, but it is far easier to just order the matte version from the start.
Mistake two: I did not pull the stove and sink. I ran the contact paper right up to the edge of the sink and the stove and tried to cut a perfect line. The line moved. Within a week, water got under the paper at the sink seam and the paper bubbled. You have to disconnect the water, pull the faucet if it sits in a hole, and at minimum loosen the sink clips so you can slide the paper an inch or two under the lip. For the stove, you cannot really pull it without killing gas, but you can lift the front edge of the stove an inch and slide the paper underneath.
Mistake three: I used a ruler and a box cutter to cut the paper. This is the mistake that cost me the most time. A box cutter drags. It tears the paper if your line is even slightly off. What you actually want is a fresh utility knife blade and a metal straightedge, replaced every three or four cuts. Or, if you have access to one, a sharp pair of fabric scissors works better than a box cutter for any curved cut around a sink.
What Sara's countertop taught me
Sara is a friend from college who moved into a rental last spring. The kitchen had a yellowed laminate countertop that had been there since about 1998. She is not handy at all. She asked me to come over for a Saturday and I told her honestly that she could do this herself in a day, but I would come help if she wanted company.
We bought two rolls of marble-pattern contact paper and one roll of solid matte white for the backsplash area behind the stove. Her counter had a weird angled corner by the fridge that I would not have known how to handle on my first try. The trick is to make a relief cut — a slit from the edge of the paper straight into the corner — and then overlap two pieces into the corner. You cannot wrap a flat sheet around an inside corner without it buckling. The relief cut is what every professional paper-hanger does on wall corners too.
Sara's counter has held up for five months now. She texts me whenever a guest compliments it and she texts me more often when someone asks if it is real marble. It is not real marble. It is a twenty-five dollar roll of paper and a Saturday afternoon.
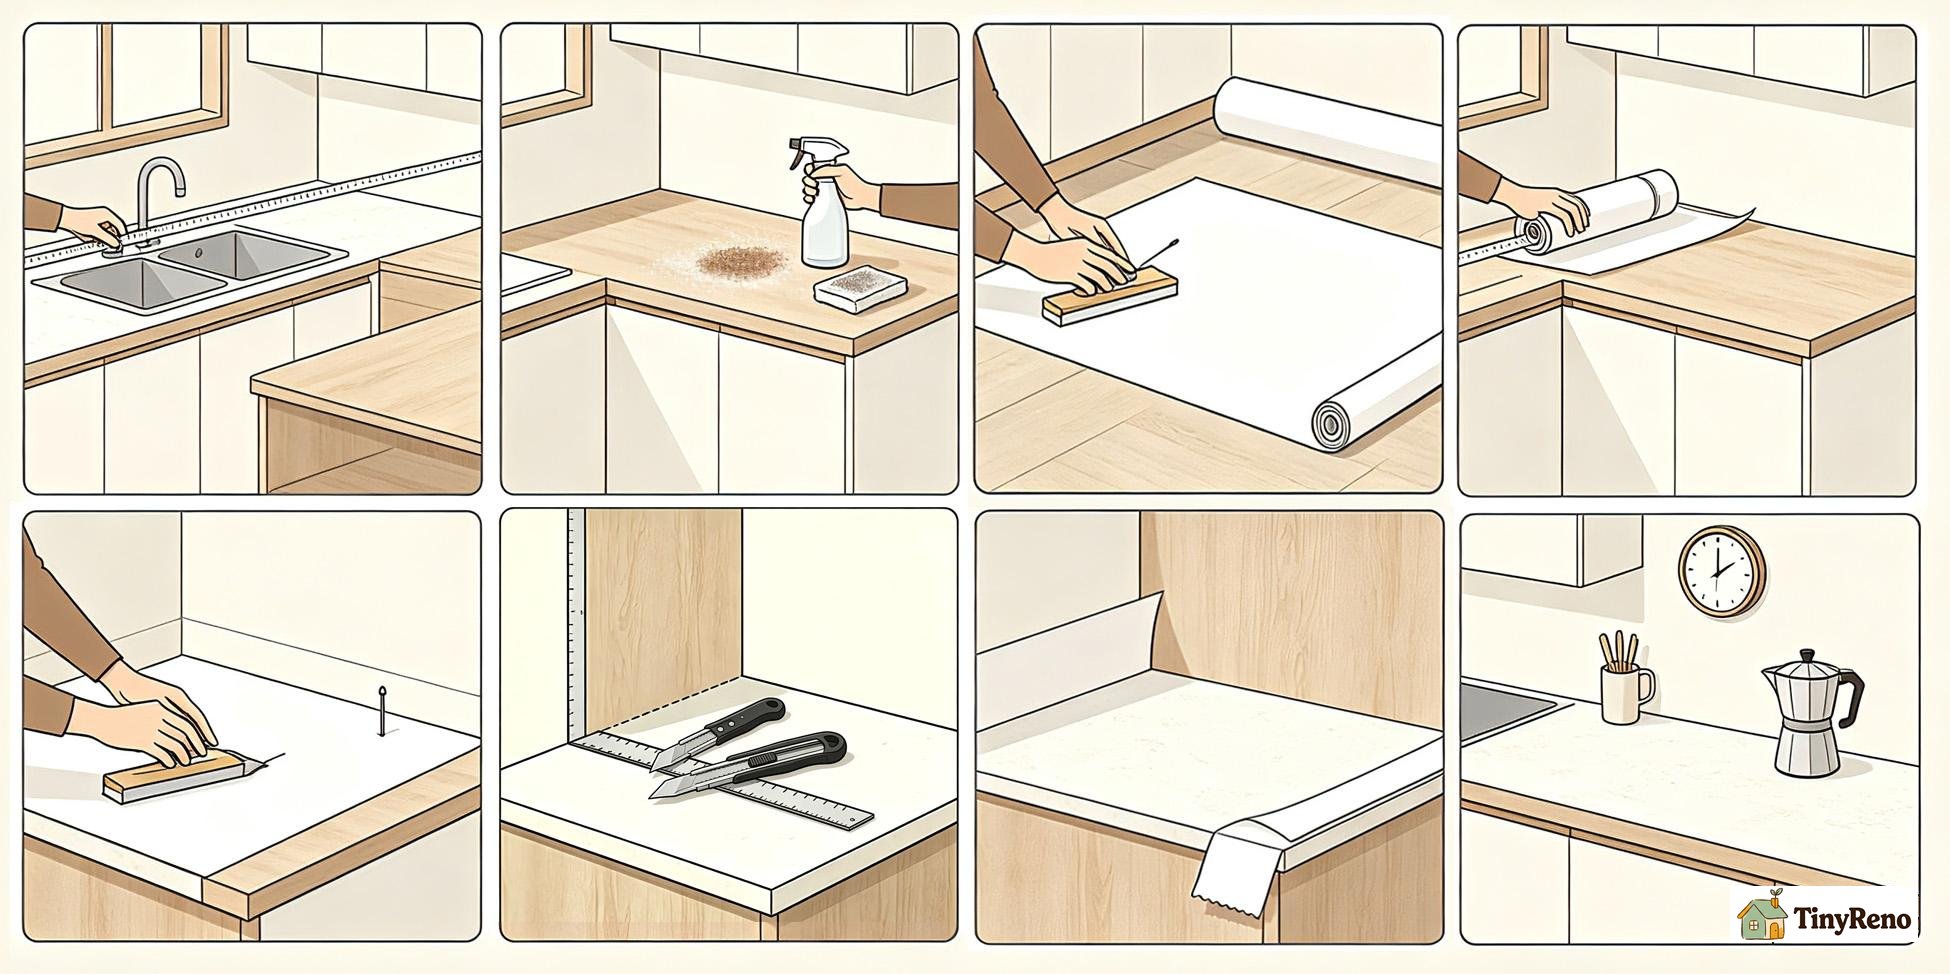
The eight steps that actually work
Here is the order I follow now, after two kitchens of practice.
Step one: Measure every flat run of counter, twice. A standard rental kitchen has three or four straight runs of counter separated by the sink and the stove. Measure each one separately and add two inches to every dimension. You will trim the overhang later. Skipping the two-inch overhang is the number one reason people run out of paper partway through.
Step two: Deep clean and lightly sand. Use a degreaser — even if the counter looks clean, it has a film on it. Wipe with denatured alcohol after the degreaser dries. Then a very fine sanding pad (220 grit or higher) just to dull the shine. You are not removing the existing finish. You are giving the adhesive something to grab. Wipe the dust off with a tack cloth.
Step three: Cut your pieces oversized. Lay the roll face-down on the floor, measure, and cut each piece at least an inch larger on every side than the counter run. The first time I tried to cut exactly to size, I ended up with pieces that were a sixteenth of an inch short and you can see the original counter underneath at the seam. Oversized is correct.
Step four: Peel and stick from the back edge. Do not start at the front lip of the counter — start at the back wall and work forward. The reason is that any seam you make will end up at the front edge where you can see it. Starting at the back lets you push bubbles forward, where you can squeegee them out toward the front lip.
Step five: Squeegee hard, then harder. A plastic squeegee or a credit card wrapped in a soft cloth works. Push from the center outward. If you see a bubble you cannot push out, prick it with a pin and push the air out through the pinhole. The pinhole will not be visible once you press the paper flat.
Step six: Trim the edges with a fresh blade. This is where the fresh blade matters. Press the metal straightedge into the corner where the counter meets the backsplash or the front lip, then run the knife along it with one firm stroke. If you have to go back and re-cut, the paper will tear. Change the blade.
Step seven: Seal the seams. This is the step most guides skip. Run a thin bead of clear silicone caulk along the back edge where the paper meets the backsplash, and along any seam between two pieces of paper. The caulk keeps water from getting under the paper. Without it, you will see bubbling within a month anywhere water sits.
Step eight: Wait twelve hours before placing anything back. I know you want to put the coffee maker back immediately. Don't. The adhesive needs to fully bond. Twelve hours is enough. Twenty-four is safer if you have the patience.
What kinds of patterns actually look good
Marble is the most popular and the most likely to look fake. The marble patterns that look real are the ones with gray veining on a warm white background, not stark black-and-white. The black-and-white ones always look like a 1990s mall food court.
Butcher block contact paper has gotten dramatically better in the last few years. The good ones have a slight texture and the wood grain does not repeat on every foot. If you want a warm kitchen for very little money, butcher block is the move.
Concrete patterns work in modern kitchens but they show dust and water spots the same way glossy contact paper does. Stick to matte.
Solid colors look the most expensive if you pick the right shade. A warm off-white, a soft greige, or a matte charcoal all read as a real honed slab if you do not look too close at the texture.
What costs what
The paper itself runs about fifteen to thirty dollars per roll depending on pattern and width. A standard kitchen takes two to four rolls. A good squeegee is five dollars. A fresh utility knife with replacement blades is another five. Caulk is four. Degreaser and denatured alcohol are about ten total. The total for my second kitchen was fifty-eight dollars, and the first time it was closer to ninety because I bought a box cutter, the wrong kind of paper, and a tape measure I already owned.
The bottom line
If you rent, if your landlord said no to a new counter, and if you can live with the idea that this is a five-year solution and not a forever solution, contact paper on a countertop is the best bang for the buck you will find. Buy matte. Pull the sink. Use a fresh blade. Caulk the seams. You will be the person your friends text when they want to do their own kitchen.


Discussion (0)
Sign in to join the discussion