

Many people wonder how do i paint laminate furniture safely, because laminate surfaces are smooth and regular paint tends to flake off easily.
I have painted laminate furniture twice. The first attempt was a yellow IKEA dresser that I bought for fifteen dollars at a yard sale. I primed it with a generic spray primer, rolled on a single coat of white wall paint, and called it done. Three weeks later the paint was peeling off in strips the size of my hand, and the dresser looked worse than it had before I started. The second attempt, on a darker laminate piece I rescued from a curb, took a weekend and held up for two years under a roommate who puts wet glasses on everything.
Most guides about painting laminate furniture skip the parts that actually matter. They tell you to sand and prime, but they do not tell you what kind of sandpaper, what kind of primer, and how long to wait between coats. They skip the topcoat. They tell you to use any old brush. After two pieces and a lot of scrap paint, here are the mistakes that peeled and the six steps that finally held.
Why laminate furniture is different from wood furniture
Laminate furniture is a printed photograph of wood, glued onto a sheet of particleboard. The top layer is a thin plastic called melamine. Melamine is what makes laminate cheap to manufacture, what makes it wipe-clean, and what makes it impossible for regular paint to bond to. If you sand too hard, you sand through the printed layer and into the particleboard. If you do not sand at all, the paint has nothing to grab. If you use a primer designed for drywall, the moisture in the primer makes the particleboard swell underneath the paint, and the paint pops off in a sheet.
The trick is to sand just enough to dull the shine, use a bonding primer designed for hard non-porous surfaces, and seal everything at the end with a topcoat you would actually put on a floor. After two pieces I learned the order matters as much as the products. Skipping or reordering any of these steps is what causes the peeling.
The five mistakes that cause paint to peel
Every peeling laminate job I have seen comes down to one of these five mistakes.
Mistake one: Skipping the bonding primer. You can sand until your arms fall off and you still cannot make regular primer stick to melamine. The primer made for laminate furniture contains a chemical that etches into the surface and gives the paint something to bite. Without that step, the paint sits on top of the plastic layer and lifts off the first time something scratches it. This is the single biggest reason laminate paint jobs fail.
Mistake two: Using a foam roller instead of a foam brush for the first coat. Foam rollers leave a slightly textured surface, which is great for topcoats but bad for the first coat over a primer. The first coat over primer wants to go on smooth and thin. A foam brush or a short-nap synthetic roller is what you want. Foam rollers look like they would do the same job. They do not.
Mistake three: Not letting each coat cure before adding the next. The can says two hours to recoat. The can is lying. Two hours is when the surface is dry to the touch. It is not when the layer underneath has hardened enough to take another coat without the two layers fusing into a gummy mess. I wait twelve hours between coats. It is annoying. It is also the difference between paint that lasts and paint that peels in a strip when you bump it with a vacuum.
Mistake four: Skipping the topcoat. Paint is color. Topcoat is protection. Without a topcoat, every fingerprint, every water ring, every minor scratch shows up in the paint. A water-based polyurethane topcoat applied in two thin layers makes the surface hard enough that you can put a wet glass on it without leaving a ring. Skip the topcoat and the whole job is decorative, not functional.
Mistake five: Painting hardware holes and handles on. Take the handles off before you start. Painter's tape does not get into the screw holes. Paint that fills a screw hole makes the handle impossible to put back on straight, and paint on the back of a handle is the kind of detail that screams DIY. Unscrew the handles. Paint the dresser. Put the handles back on after the topcoat dries.
What Sara's dresser taught me
Sara is a friend who bought a used laminate dresser for her first rental, two days before her partner moved in. She asked me to come help because she wanted a navy blue dresser and had never painted anything bigger than a picture frame.
We spent the first hour just prepping. We took the drawers out, pulled the handles off, wiped every surface with a degreaser, and sanded the whole thing with a fine sanding pad until the shine was gone. The actual painting took less than an hour. We waited twelve hours between each coat, which meant the job took a full weekend, but it also meant her dresser has held up for eighteen months and counting.
The single biggest thing Sara learned was the primer step. She wanted to skip it because it felt like the boring part. I made her do it anyway. Two months later she texted me a photo of a water ring that wiped right off the surface. That was the topcoat doing its job over the primer doing its job over the sanding doing its job.
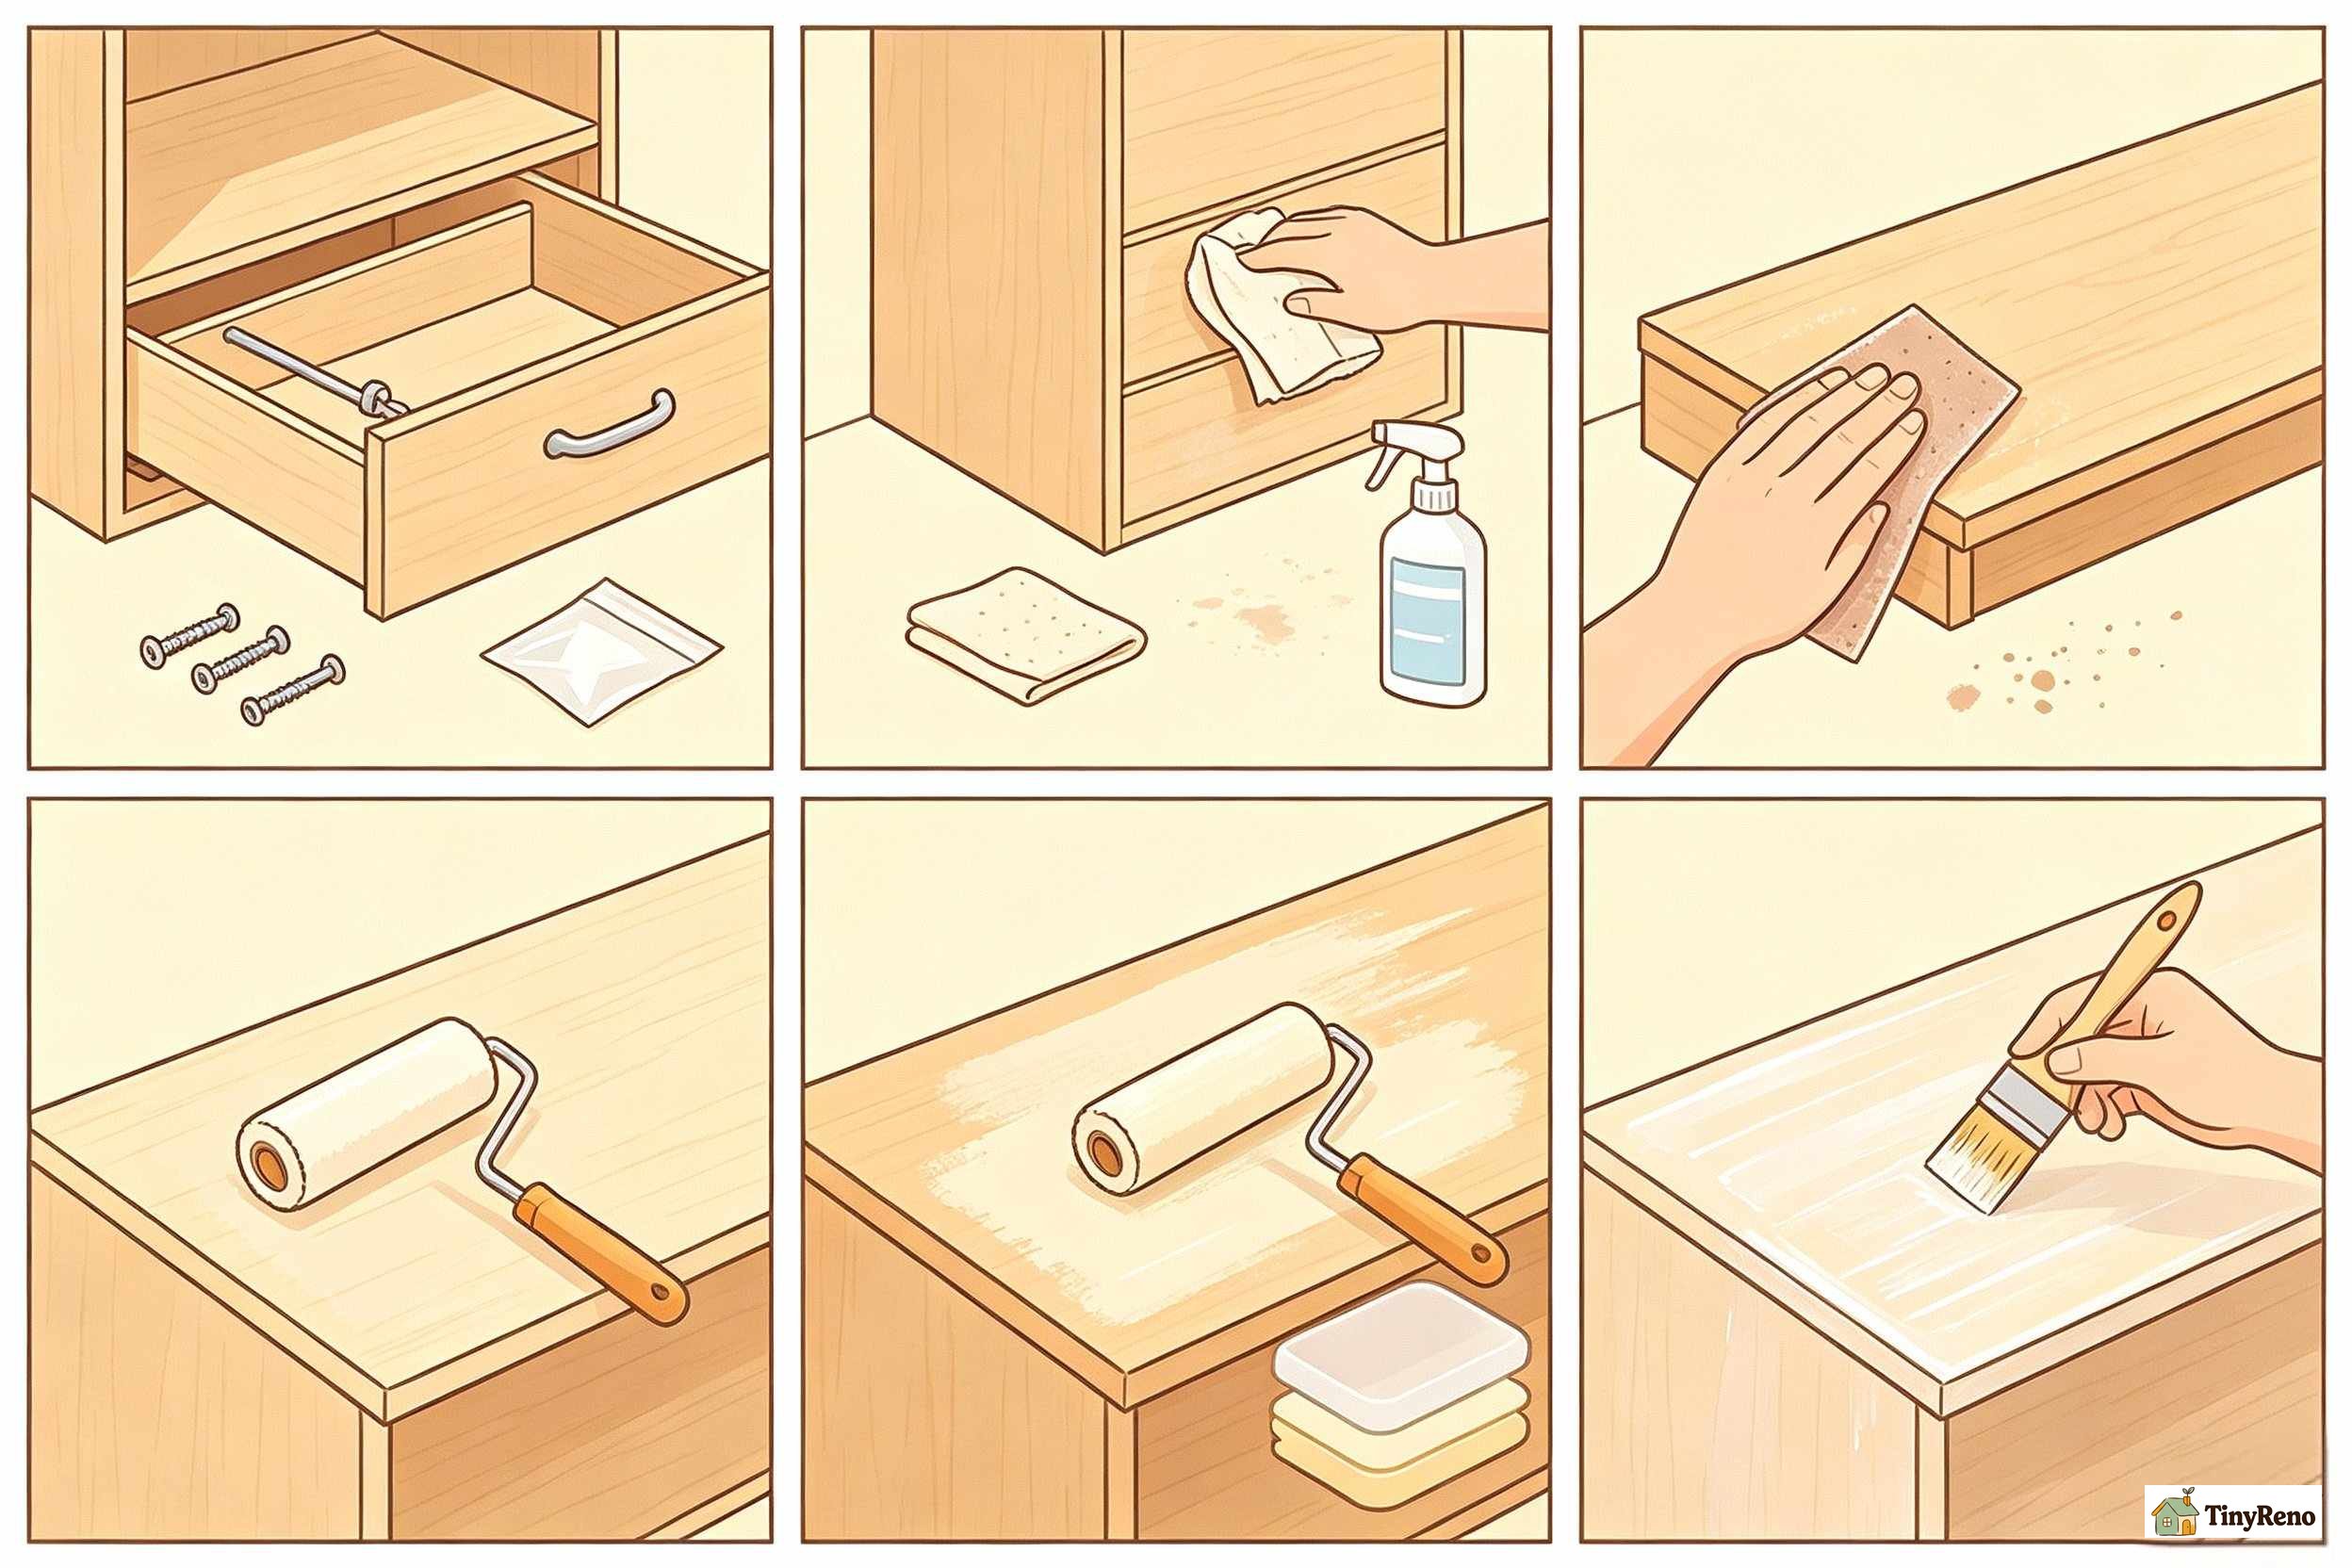
The six steps that actually hold
Here is the order I follow now, after two pieces of practice and a lot of paint can labels read in the hardware store aisle.
Step one: Take everything apart. Pull the drawers out, unscrew every handle, and set the hardware in a labeled bag. Painter's tape over hardware is a lie you tell yourself at 10 p.m. on a Saturday. Just take it off.
Step two: Clean and degrease. Wipe every surface with a degreaser, then with denatured alcohol. The denatured alcohol step is the one most guides skip and it is the step that catches the residue the degreaser leaves behind. Anything oily or waxy left on the surface will repel the primer and the paint will not bond.
Step three: Sand just enough to kill the shine. Use a 220-grit sanding pad and go over the entire surface with medium pressure. You are not trying to remove the printed wood pattern. You are trying to rough up the smooth plastic top layer so the primer has something to grab. Wipe off the dust with a tack cloth. If you skip the tack cloth, the dust mixes into the primer and ruins the finish.
Step four: Bonding primer, one thin coat. Use a bonding primer designed for laminate, melamine, or hard non-porous surfaces. The can will say "bonds to glossy surfaces without sanding" on it. That is the marketing. You still need to sand first. Brush or short-nap roller, thin coat, no thick streaks. Wait twelve hours.
Step five: Two thin topcoat paint layers. Use cabinet paint or furniture paint. Wall paint works but it does not cure as hard. Apply two thin layers with a foam brush or short-nap roller, twelve hours apart. Thick coats look better going on. They sag and stay soft. Thin coats build up a hard surface.
Step six: Two thin water-based polyurethane topcoats. Use a water-based poly, not oil-based. Oil-based yellows over white and softens under heat. Water-based poly stays clear and hard. Two thin coats, twelve hours apart, before you put anything back on the surface. Forty-eight hours of total cure time before heavy use is what the can will say. I have skipped this and regretted it.
What products actually cost what
The full kit for a single dresser is about forty-five dollars if you already own sandpaper and a tack cloth. Degreaser is six dollars. Denatured alcohol is eight. Bonding primer is around fifteen for a small can. Cabinet paint is twenty for a quart, and you will use maybe half. Water-based polyurethane is fifteen. Brushes, rollers, and the tray are another ten if you do not have them. My second dresser, including a new can of paint because I had used up the first, came in at fifty-eight dollars.
The cheap shortcut that is not actually a shortcut is to skip the primer and buy a "paint and primer in one" can. Those products work on drywall. They do not work on laminate. The bonding primer is a separate product for a reason.
The bottom line
If you rent, if your landlord does not care about a yellow dresser as long as you do not damage the walls, and if you are willing to spend a weekend waiting for paint to cure, a laminate furniture flip is one of the most satisfying projects in a rental. The mistakes are the same five mistakes everyone makes. The fix is the same six steps every guide skips. Take the handles off. Sand the shine off. Prime with a bonding primer. Wait twelve hours. Paint in thin coats. Topcoat with water-based poly. You will be the person your friends text when they find a curb dresser.


Discussion (0)
Sign in to join the discussion