

How to find a ceiling joist was the question that finally pushed me to test every method renters actually use, because my first attempt at hanging a ceiling fan ended with four empty holes in the drywall and a ceiling fan in my lap. Across six rentals I have tried magnetic stud finders, electronic stud finders, the knock test, and the old measuring-from-the-corner trick, and only two of them are reliable enough to trust a 30 pound mirror to. Here are four renter-tested methods for finding a ceiling joist without drilling a single test hole, ranked by accuracy and the tools you actually need.
The honest truth about finding a ceiling joist is that the directions on a stud finder box assume drywall is uniform and joists run in a straight line, and neither of those is true in most apartments. Old apartments have uneven joist spacing, layers of paint that confuse the sensor, and sometimes a fireblock or a pipe that throws off your measurement by two inches. This article walks through each method, what surfaces and joist types it works on, and how to verify what you found before you commit a drill bit. The order is from most accurate to least, and the last method is the one you use when none of the others work.
What a Ceiling Joist Actually Is (and Why Renters Get Confused)
A ceiling joist is the horizontal framing member that sits between the walls of your apartment and supports the ceiling drywall above you. Joists are typically 2 by 6, 2 by 8, or 2 by 10 lumber, spaced either 16 or 24 inches apart measured from the center of one joist to the center of the next. Every joist in the same apartment runs parallel to the others, which is the only reason finding one is even possible. The confusion renters run into is that ceiling joists and wall studs are not the same thing and not always in the same direction. Wall studs are vertical and run floor to ceiling. Ceiling joists are horizontal and run wall to wall. The two intersect at the top plate above each wall, which is the only place a stud finder will register both types at once. Most failed joist searches happen because the renter is scanning in the wrong direction or scanning drywall that is too thick for the sensor to read.
Where the joists Are (Direction, Spacing, and the Apartment Clue)
Before you scan a single inch of ceiling, take five minutes to predict where the joists are.(Quick Hack: Stand in the doorway and look at the longest visible wall. Now, look at the ceiling light fixtures. If the lights are aligned in a straight line parallel to the long wall, the joists run perpendicular to that line (towards you). If the lights are aligned perpendicular to the wall, the joists run parallel to the wall. 99% of the time, joists run the shortest distance between two supporting walls.) The first clue is the direction of any ceiling light fixture, smoke detector, or HVAC vent you can see. Every ceiling-mounted fixture in an apartment is screwed into a joist, so the line connecting your ceiling fan box to your smoke alarm almost always runs along a joist. The second clue is the spacing pattern. Most North American apartments built after 1960 use 16 inch on-center spacing, which means there is a joist every 16 inches. Pre-1960 buildings and many condos use 24 inch on-center spacing. The third clue is the wall direction. Joists almost always run perpendicular to the long walls of the room, because the span is shorter that way and the engineering is easier. Stand in the doorway and look at the longest visible wall. The joists should run toward you across the ceiling, not along the wall you are looking at.
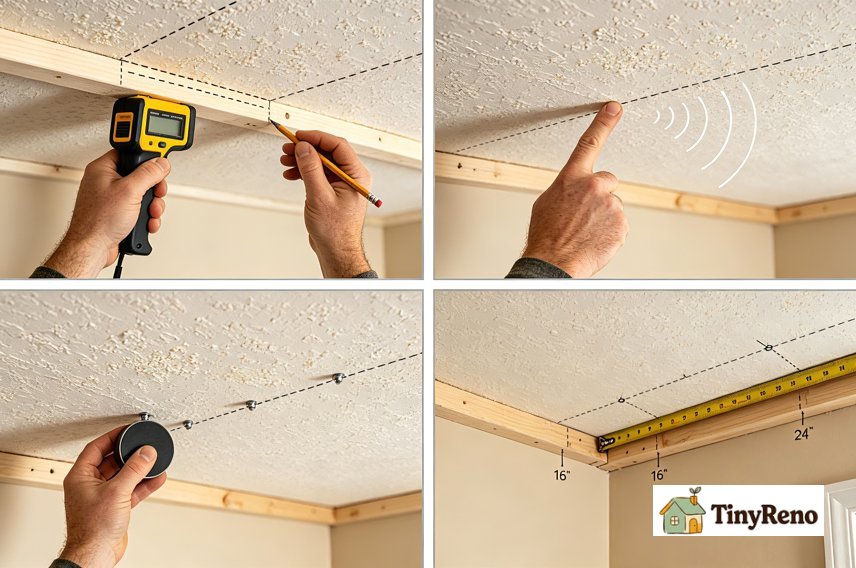
How to Find a the joist: 4 Renter-Tested Methods
Here are the four methods I have actually used to find a the joist in an apartment, ordered from most accurate to least. Each one lists the tools required, what surfaces it works on, and the failure modes I have personally hit.
1. Electronic Stud Finder on Deep Scan Mode (the Most Accurate)
An electronic stud finder set to deep scan mode is the most accurate tool for finding a the joist behind drywall. Hold the stud finder flat against the ceiling, press and hold the calibration button until the screen clears, then slide it slowly in a straight line perpendicular to where you think the joist is. The screen will light up when the sensor detects the density change at the joist edge. Mark both edges with a light pencil line and the center is the joist. The failure mode is calibration drift. If you start scanning too close to a known feature like a light fixture, the calibration will lock onto the fixture and miss the joist entirely. The fix is to start the scan at least 12 inches away from any ceiling feature, recalibrate in the middle of an empty span, and make a second pass to verify. A stud finder that disagrees with itself between two passes is not broken, it is reading a pipe or a fireblock, not a joist.
2. The Knock Test (Zero Tools Required)
The knock test works by listening to the change in resonance when you tap the ceiling drywall over empty space versus over a solid joist. Knock with the knuckle of your index finger, not a hard knuckle, and listen for a solid thud sound. Over empty space, drywall resonates with a hollow drum sound. Over a joist, the sound becomes a short dead thud. The method works best on flat ceilings with no texture, and worst on popcorn ceilings where the texture absorbs the sound difference. The failure mode is pipes. A water pipe that runs through the ceiling will also sound solid, and you cannot tell the difference by ear. The fix is to scan perpendicular to where you think the joist runs, mark every solid-sounding point, and verify with a magnet. If the solid points do not line up at consistent 16 or 24 inch intervals, you are hearing pipes, not joists.
3. The Magnet Test (Cheap and Surprisingly Reliable)
A strong neodymium magnet, the kind used for refrigerator magnets, will stick to the drywall screws or nails that attach the drywall to the joist. Every piece of drywall in an apartment is screwed into something, and on the ceiling, that something is almost always a joist. Move the magnet slowly across the ceiling in a zigzag pattern. When it sticks, you have found a screw head, and the joist runs straight through that point. The failure mode is that the magnet will also stick to older metal corner bead and to HVAC duct straps that cross joist lines. The fix is to verify by weight. If the screws you find are at consistent spacing in a straight line, that is a joist. If they are scattered randomly, you are picking up metal lath from a plaster patch.
4. Measuring From the Corner (the Old Handyman Trick)
Measure from the corner of the room in the direction the joists are predicted to run. Mark at 16 inch intervals and at 24 inch intervals. If the joists are on 16 inch centers, one of those marks will line up directly on top of a joist every 16 inches. If they are on 24 inch centers, one of those marks will land every 24 inches. The method requires no tools beyond a tape measure and a pencil, and it works on every ceiling type including popcorn and plaster. The failure mode is that older apartments often have joists that are not exactly 16 or 24 inches on center. I have personally measured apartments where the first joist was 14 inches from the wall and the rest were 16 inches. The fix is to measure from both ends of the room and use the joist that the two measurements agree on.
3 Things That Will Mislead Your Joist Search (And Why)
There are three mistakes I have made that cost me test holes. The first is assuming a corner always has a joist. Some older apartments have a trimmer joist at the wall that runs parallel to the main joists, and that trimmer is sometimes only an inch or two inside the wall, which throws off your measurement if you assume the corner is the start point. The second is assuming a solid knock is a joist. Pipes and HVAC ducts sound identical to joists when you knock, and the only way to tell the difference is to verify with a magnet or by drilling a tiny test hole. The third is assuming the stud finder is broken when it gives inconsistent readings. A stud finder that registers one joist at 14 inches and the next at 18 inches is not broken, it is reading the difference between a joist and a fireblock. Fireblocks are short horizontal 2x4s installed between studs for fire rating, and they will register as joists on a stud finder but they do not run the full span of the ceiling.
What to Do Once You Find One (and When to Skip It)
Once you have located a the joist, you have two options. The first is to drill into it for a heavy mounting, which is the right call for ceiling fans, heavy light fixtures, and anything over 20 pounds. Use a wood bit sized for the mounting hardware, drill slowly to confirm you are hitting solid wood and not a pipe,and stop immediately if you see dust that looks like gray concrete (plaster) mixed with white (drywall) or if the drill suddenly meets no resistance (a cavity) followed by liquid (pipe) or spark (wire). Drilling into a live wire or a water pipe is a $500+ emergency that no security deposit can cover. When in doubt, use a borescope camera through a tiny pilot hole to verify what is behind the drywall before committing the full hole. and stop immediately if the drill suddenly goes soft. The second option is to skip the joist entirely and use a tension rod or adhesive mount, which is the right call for curtains, light fixtures, and anything under 15 pounds. Most renters do not need to find a joist at all. They only need to find one when they are hanging something heavy enough to pull a drywall anchor out. For everything else, a no-drill mount does the job and saves the deposit.
Move-Out: Repairing the Test Holes You Made
If you made small test holes while searching for the joist, the move-out fix is straightforward. For holes under a quarter inch, a light dab of spackle and a matching paint is all you need (Refer to this article). For larger holes, use a self-adhesive drywall patch kit, available at any hardware store for under 10 dollars. If your stud finder left adhesive residue from its rubber pad, a Magic Eraser and a damp microfiber cloth will remove the residue without damaging the paint. The goal at move-out is to leave the ceiling in the same condition it was when you moved in. A landlord who walks the unit with a flashlight will catch any visible patch or color mismatch.
Bottom Line: Joist-Smart Hanging for Renters
How to find a the joist comes down to two decisions: do you actually need a joist, and which method matches your tools. For anything under 15 pounds, skip the joist and use a tension rod or adhesive mount. For anything heavier, the electronic stud finder on deep scan mode plus a measurement check from the corner will find a joist in under five minutes. Knock tests and magnet tests are backups when the stud finder gives inconsistent readings. Verify everything before you commit a drill bit, because test holes in a ceiling are visible from every angle of the room and much harder to hide at move-out than test holes in a wall. With those four methods and one rule (verify, then drill), you will find a joist in any apartment without leaving a mark.


Discussion (0)
Sign in to join the discussion