

Over three apartments and a parent who used me as free labor in 2017, I've patched 6 small holes in ceilings — 4 of them from anchor failures, 2 from when I tried to mount a swing that came loose. Out of those 6, 4 of my first attempts failed within a year. The pattern I kept repeating: I used spackle because it was on the hardware store shelf next to the drywall supplies, I didn't tape the inside of the hole first, and I sanded too hard. The 2 patches that held for 4+ years used a completely different approach. The difference wasn't the materials — it was the patience. Here's what I wish someone had told me before I spent a year looking at my own bad patches.
Why Small Holes in the Ceiling Happen (and Why It Matters)
Looking back, every ceiling hole I've ever patched came from one of four situations. Drywall anchors that pulled out when I removed a shelf. Screws that missed the joist and just spun in drywall. Old fixtures — smoke detectors, light fixtures, ceiling fans — that someone removed before I moved in and never patched. And accidents: a doorknob swung upward, a kid with a stick, a tall bookshelf that tipped while I was moving it.
Here's the part nobody tells you: landlords don't charge per wall. They charge per hole. I found this out the hard way when a friend lost $80 off her deposit for three tiny anchor holes in one ceiling. The fix would have cost her $5 and ten minutes. That math is brutal, and it's why I now treat every small hole like it's a line item on my move-out bill.
A Quick Note on Materials
Before we start, a quick clarification on two terms you'll see in this guide:
-
Lightweight Spackle: This is the lightweight, pinkish or white paste sold in small tubs. It dries fast (30-60 mins) and shrinks very little. Use this for Fix 1 and Fix 2 (tiny holes).
-
Joint Compound (or "Mud"): This is the heavier, white, pre-mixed mud sold in gallon buckets. It dries slowly (24+ hours) and shrinks more. Use this for Fix 3 (mesh patches) and any repair larger than a dime. Never use spackle for mesh patches—it lacks the strength and will crack.
Both materials are inexpensive and available at any hardware store. Buy a small tub of spackle and a gallon of joint compound, and you'll be set for years of renter repairs.
Match the Fix to the Hole Size
Before you touch a putty knife, measure (or eyeball) the hole. The fix changes at roughly 1/2 inch, 1 inch, and 2 inches. Smaller than that — picture hanging pin holes, tiny screw nicks — needs almost nothing. This section covers the four sizes of holes and the right fix for each.
Pin holes and tiny screw holes (under 1/4 inch)
These are the holes left by a picture hanger, a small finishing nail, or a screw that just dimpled the drywall paper without breaking through. The fix is so light it barely counts: one pass with your fingertip dipped in spackle, let dry, one swipe of ceiling paint. Total time: 10 minutes. Tiny pin holes are usually invisible after a single paint coat.
Anchors and screws (1/4 to 1/2 inch)
The most common scenario. A drywall anchor pulled out, a ceiling hook came down with a chunk of paper, a screw hole that wasn't filled when something was removed. The hole is bigger than a pinhole but the drywall is still intact around it. The fix is the standard "spackle and paint" — three steps, no special tools.
Larger anchor pulls and small fixture holes (1/2 to 2 inches)
These are the ones most people get wrong. A 1-inch hole has drywall missing from the center, not just a divot in the paper. Spackle alone will sink into the hole as it dries, leaving a depression that shows through paint. You need either a self-adhesive aluminum patch (peel-and-stick, $3 for a 4-inch square) or a small piece of drywall cut to fit and held in with a backing. Either works; the patch is faster for beginners.
Anything bigger than 2 inches
Outside the scope of a small repair. Use the same technique as a large drywall patch — backing board behind, drywall piece cut to fit, tape and three coats of mud. The cost to mud and tape drywall guide covers this in detail, and it's the kind of job most renters should hand to a landlord or handyman rather than DIY.
The 4 Fixes That Actually Work
For the four sizes above, here are the four fixes. Pick one based on your hole.
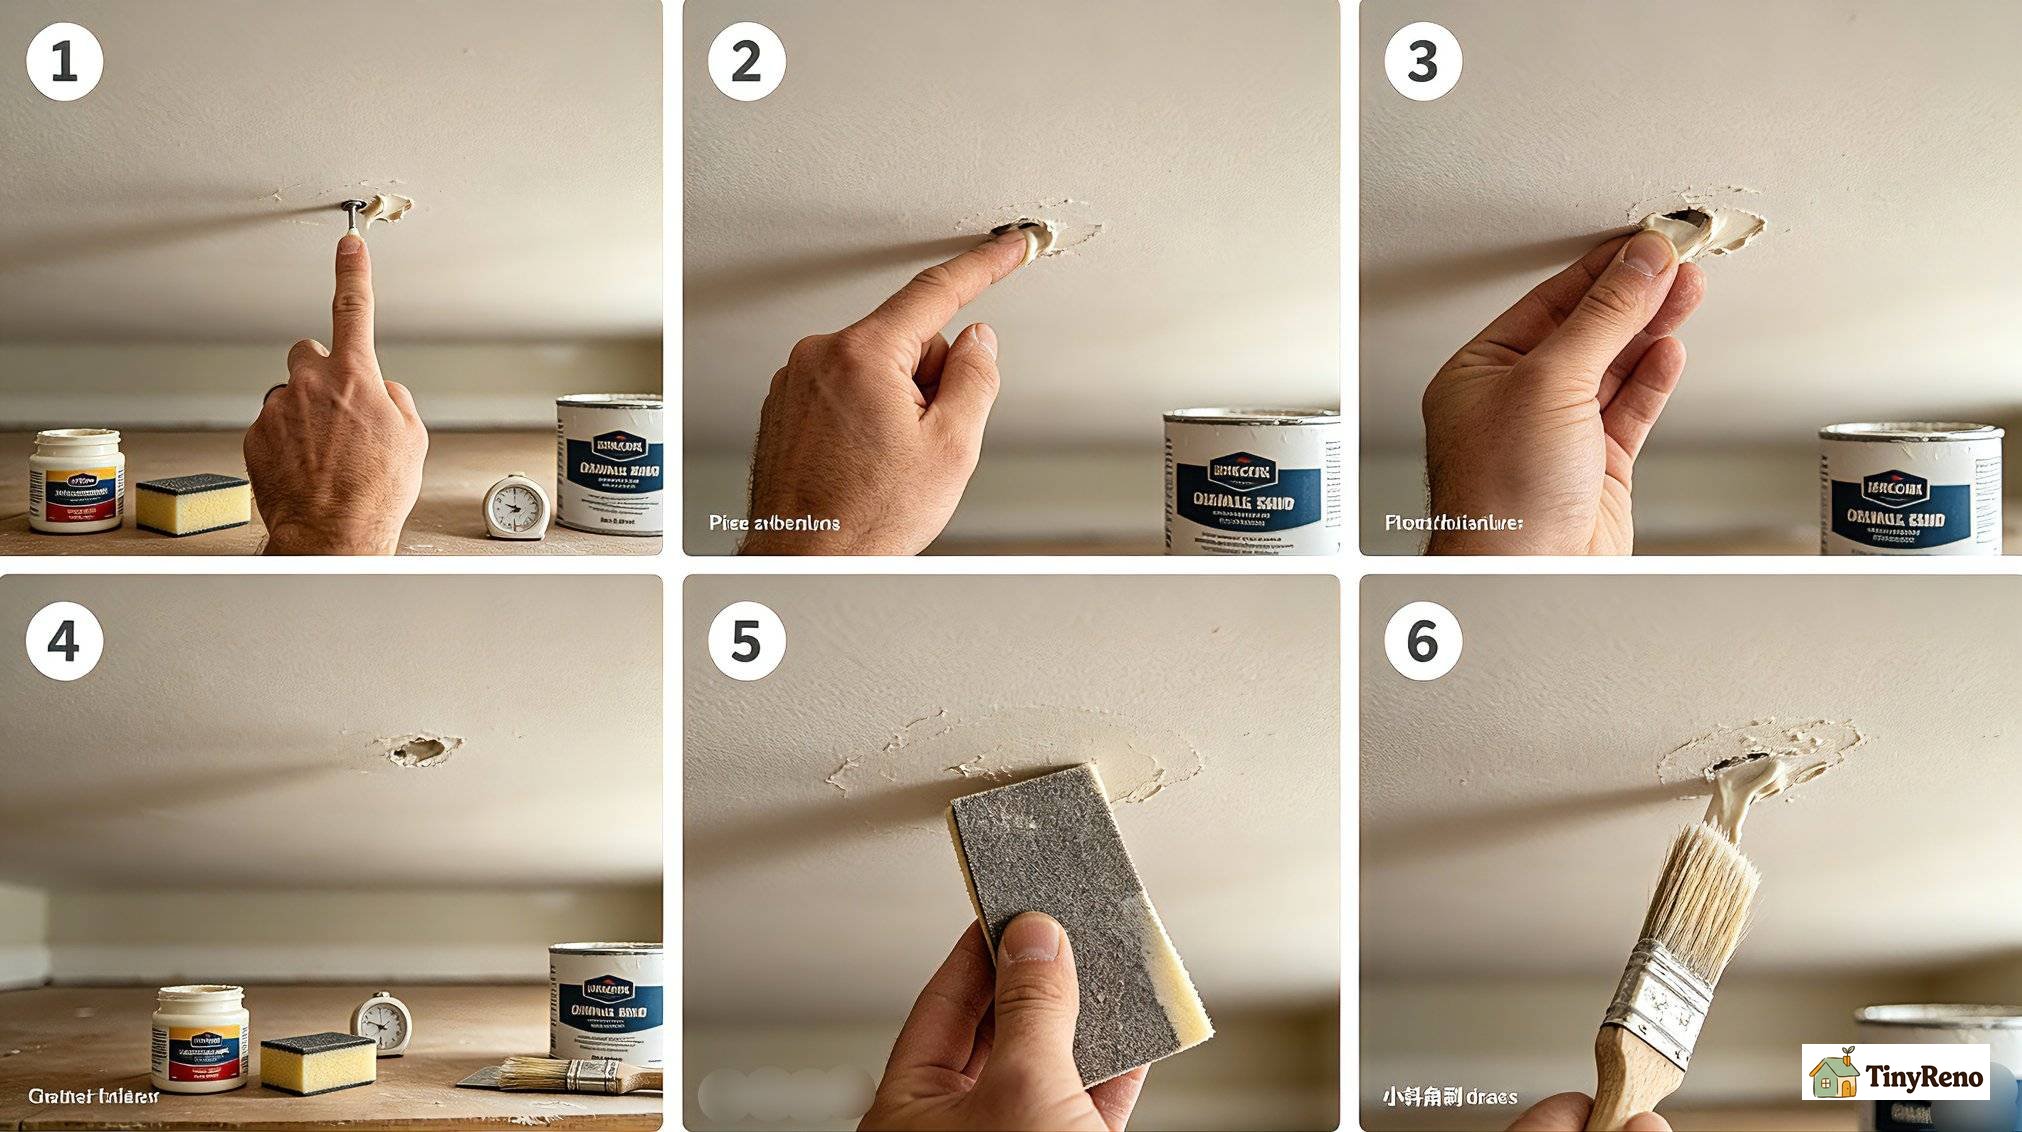
Fix 1: Spackle dab (for pin holes and tiny divots)
Time: 10 minutes plus dry time.
Materials: Lightweight spackle (a small $5-$8 tub covers dozens of holes), damp rag, ceiling paint to match.
Step 1: Dip your fingertip in the spackle. Get a pea-sized amount.
Step 2: Press it into the hole with a slight twist — this forces spackle into the cavity, not just over the top.
Step 3: Smooth it flat with your finger. Don't try to make it perfect — you'll sand it after.
Step 4: Let it dry 30-60 minutes (lightweight spackle dries fast).
Step 5: Lightly sand with 220-grit sandpaper or a sanding sponge until smooth.
Step 6: Paint with ceiling paint, slightly overlapping the surrounding area.
The result should be invisible against the ceiling. If you can see a depression or a ring, the hole was deeper than you thought and needs Fix 2.
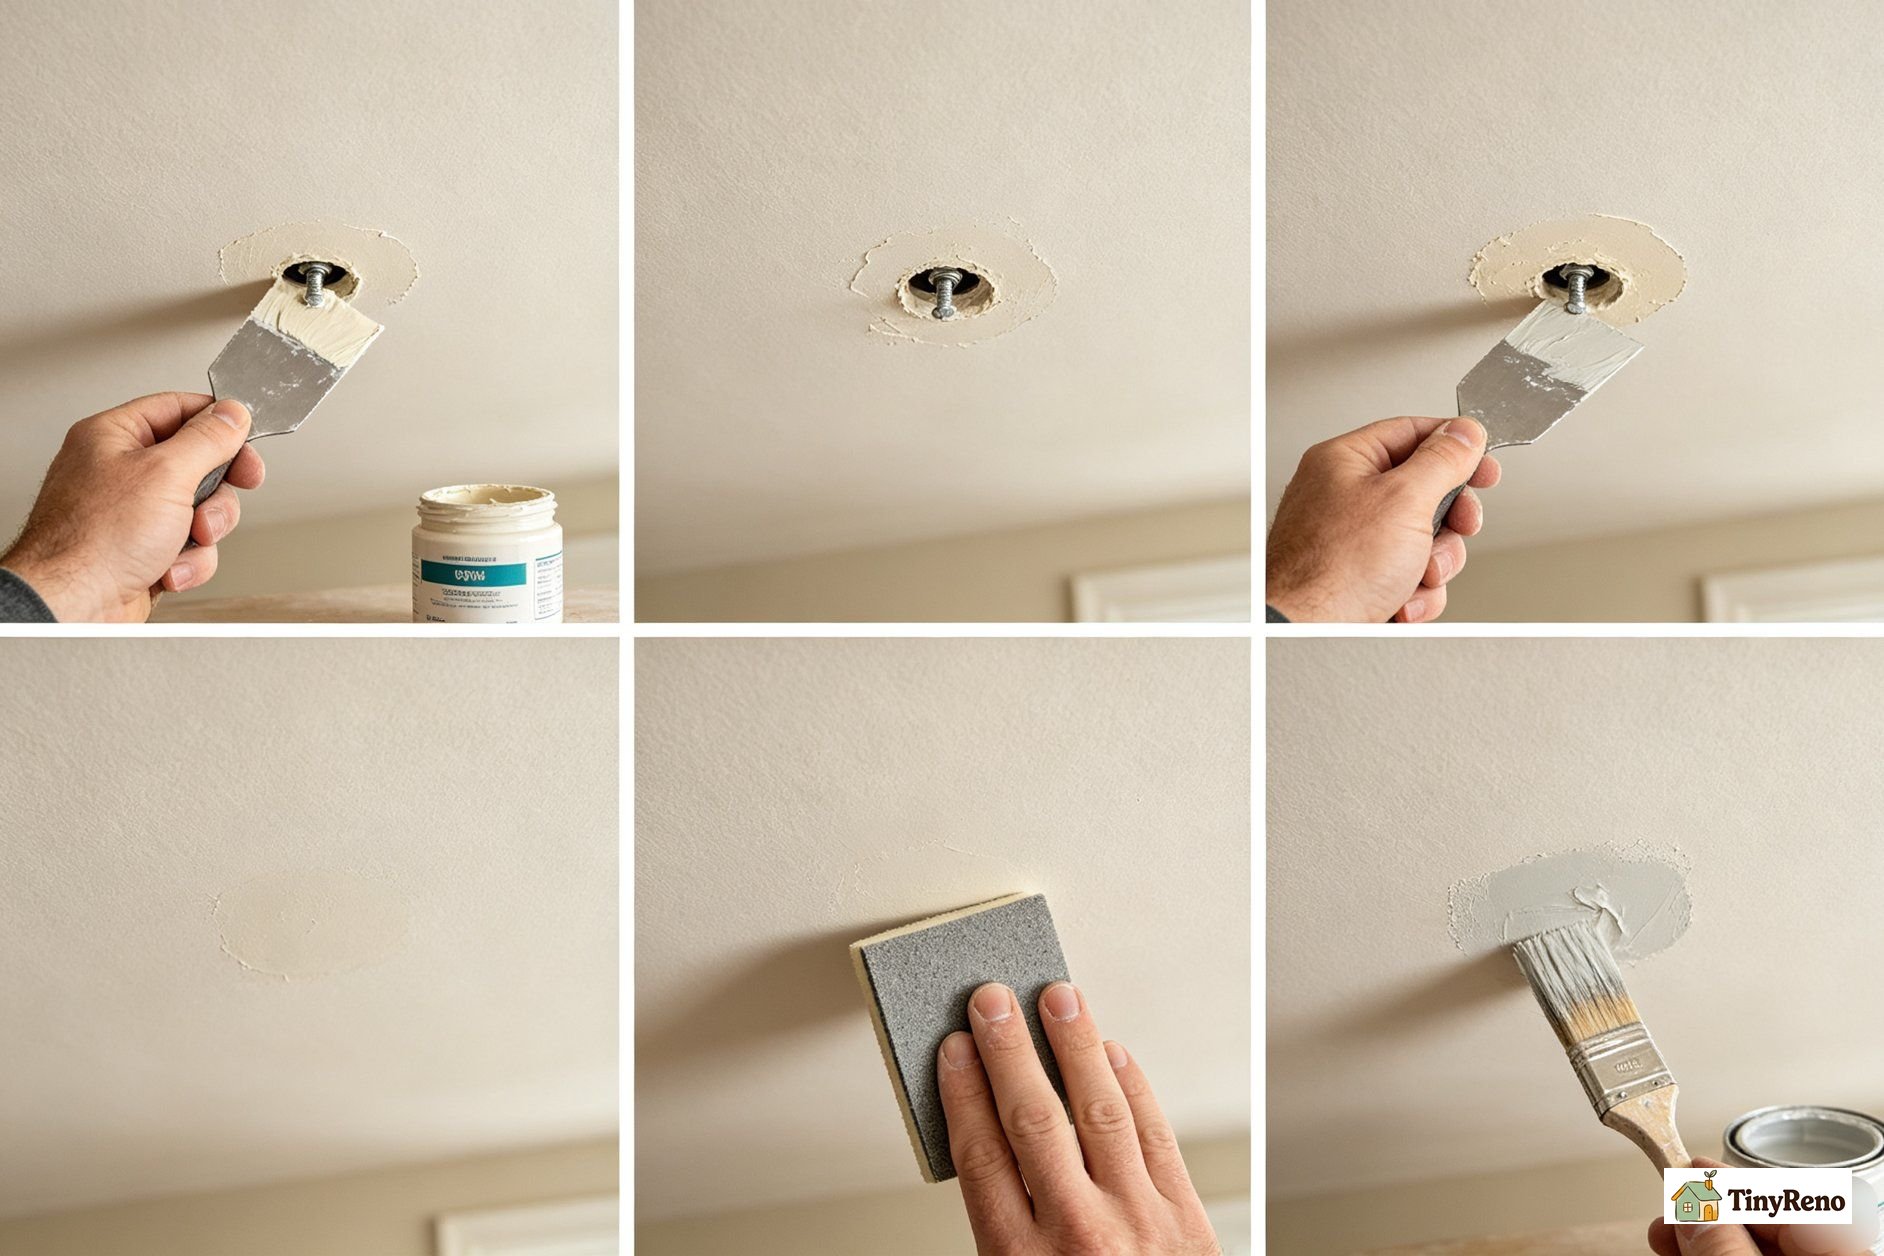
Fix 2: Spackle + 2-coat fill (for anchor and screw holes)
Time: 30 minutes of work over 2 hours (most of which is dry time).
Materials: Lightweight spackle, 3-inch putty knife, 220-grit sandpaper, ceiling paint.
Step 1: Use a putty knife or even your fingertip to press spackle firmly into the hole. A knife helps scrape the surface flush, but a finger works well to pack the spackle deep into the cavity. Scrape the surface flat.
Step 2: Wait 1-2 hours for the first coat to dry.
Step 3: Apply a second thin coat. The first coat shrinks slightly as it dries; the second coat fills the depression.
Step 4: Wait another 1-2 hours.
Step 5: Sand flat with 220-grit until you can't feel the patch with your fingertip running across it.
Step 6: Prime with a small brush (this is the step most people skip and then wonder why the patch shows), then paint.
The primer step is non-optional. Bare spackle absorbs paint differently than the surrounding drywall, and skipping primer makes the patch flash through the paint. A $5-$8 small can of drywall primer (Zinsser, Kilz) covers dozens of patches.
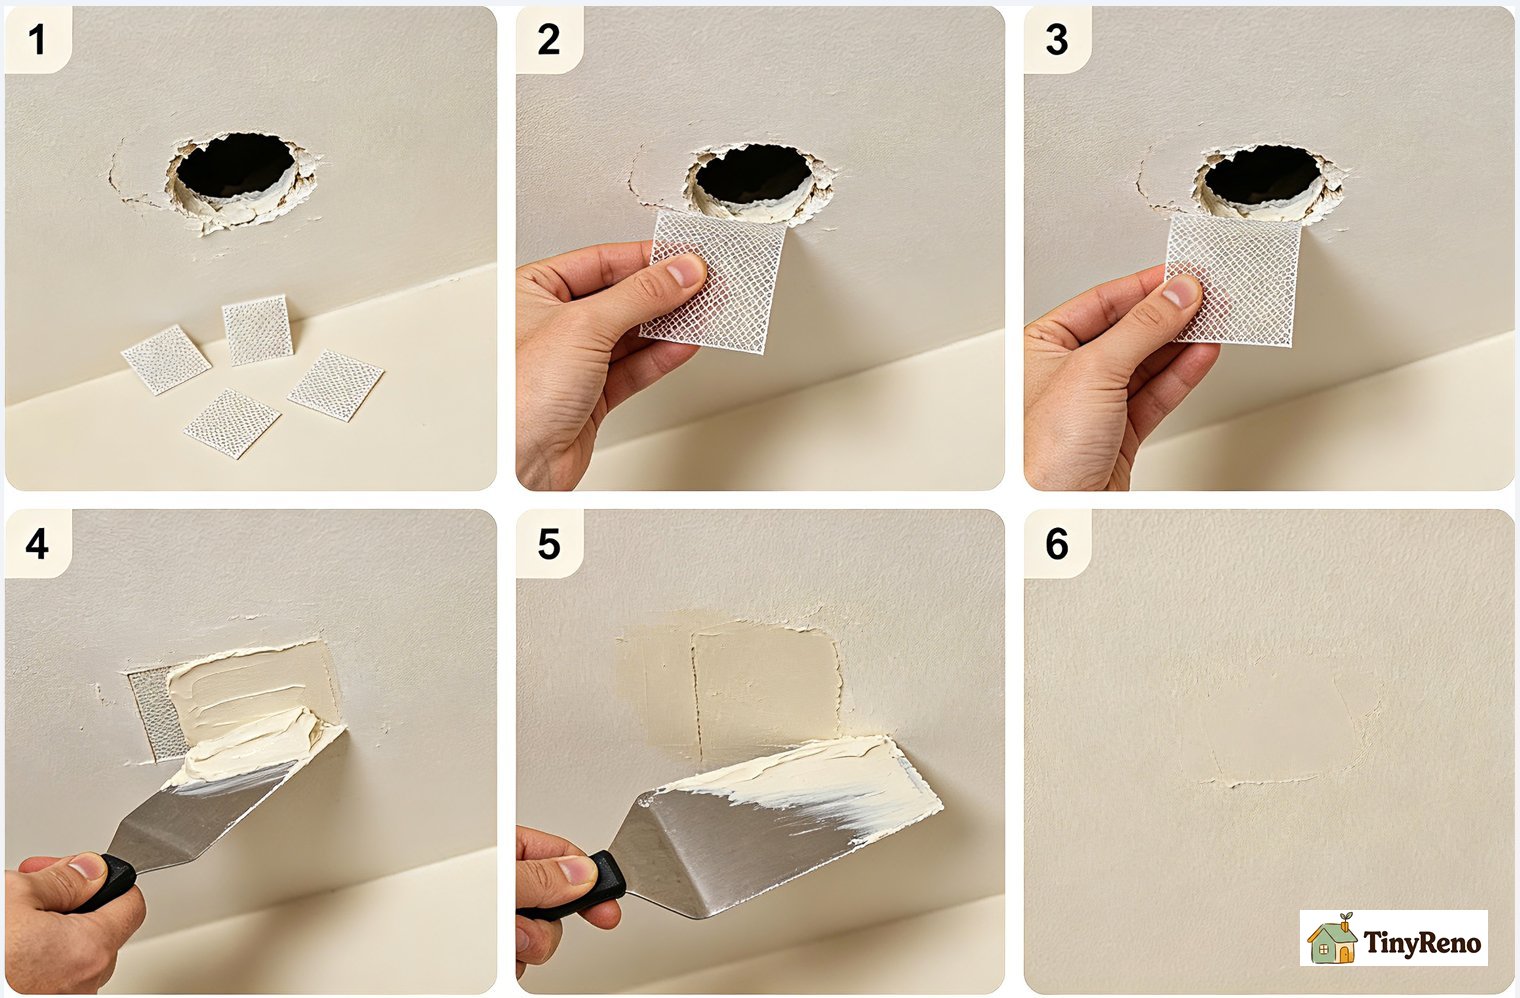
Fix 3: Self-adhesive patch (for 1/2 inch to 2 inch holes)
Time: 45 minutes plus overnight dry time for the mud coats.
Materials: Self-adhesive aluminum mesh patch ($3 for a 4x4 or 6x6 sheet — get several), lightweight spackle, 3-inch and 6-inch putty knives, sandpaper, primer, paint.
Step 1: Cut the patch to size so it covers the hole with at least 1/2 inch of overlap on all sides.
Step 2: Stick it over the hole, adhesive side down. Press firmly so the mesh sticks flat to the ceiling.
Step 3: Apply a thin coat of spackle over the patch, working from the center outward. The first coat fills the mesh.
Step 4: Let it dry overnight — mesh patches need longer than small dab repairs.
Step 5: Apply a second wider coat with the 6-inch knife, feathering the edges so the patch blends into the surrounding ceiling.
Step 6: Let dry, then a third coat if you can still see the mesh pattern.
Step 7: Sand smooth with 220-grit, prime, paint.
This works for almost every "small hole" scenario a renter will encounter. It's also the right approach for the slightly larger holes left when someone pulls out a toggle bolt or removes a ceiling-mounted light fixture.
Fix 4: The landlord fix (for anything you shouldn't DIY)
Not a fix you do — a fix you delegate. Some ceiling holes are the landlord's responsibility regardless of size:
- Holes left by fixtures that were there when you moved in (smoke detectors, light fixtures, ceiling fan mounting brackets).
- Holes caused by normal settling or building maintenance access.
- Any hole you can see the back of, where drywall paper is hanging or the gypsum is crumbling.
- Multiple holes in the same area suggesting a structural or water issue behind the ceiling.
Send the landlord a photo with a short note. The fix is on them, including the paint match.
The Mistakes That Make Patches Visible
Five common errors that turn an invisible patch into an obvious one. All five are fixable on the second attempt, but they're easier to avoid than redo.
1. Skipping primer
Already covered but worth repeating. Spackle and joint compound absorb paint at a different rate than drywall. Without primer, the patch will look like a slightly different color even after two coats of ceiling paint. Always prime.
2. Using setting-type compound for small repairs
Setting-type joint compound (the powder you mix with water) is great for big jobs because it dries fast. For small repairs, it's overkill — it sets up in 20-90 minutes and becomes very hard to sand smooth. Lightweight premixed spackle sands easily and dries plenty fast for hole repair.
3. Trying to fill a deep hole in one coat
Spackle shrinks as it dries. A hole that's 1/4-inch deep filled in one coat will be 1/8-inch deep after drying. Either fill in multiple thin coats or use a setting-type compound that doesn't shrink. Multiple thin coats is the easier DIY option.
4. Painting before fully dry
Most lightweight spackles say "paintable in 30 minutes" on the label. They're not lying, but they mean the surface is dry enough to accept paint — not that the patch is fully cured. Painting over a not-fully-cured patch causes flashing and a slightly different sheen. Wait 2-4 hours after the last spackle coat to paint.
5. Not feathering the edges
The transition between patch and surrounding ceiling should be a smooth slope, not a hard edge. Use a wider putty knife (6-inch or 8-inch) on the final coat and feather the edges by pressing lighter as you move outward. The patch should feel smooth to a fingertip running across it, not have a detectable hump.
What About Matching the Ceiling Texture?
Most apartment ceilings are flat-painted smooth or have a light "orange peel" texture. Smooth ceilings are easy to match — your patched area blends in once primed and painted. Orange peel is harder because the texture is sprayed on, and brush or roller can't replicate the splatter pattern. Here's the practical test:
- If the surrounding ceiling is smooth, you're fine with spackle + sand + paint.
- If the ceiling has light orange peel, a can of spray texture ($8-$12) matched to the existing pattern can blend the patch in. Practice on cardboard before you hit the ceiling.
- If the ceiling has heavy texture (knockdown, Spanish lace, deep orange peel), call the landlord. Matching heavy textures is a skill that takes practice, and most landlords will redo the texture for free.
The Move-Out Inspection Reality
Here's the part most renter guides skip: ceiling patches that look invisible to you will be flagged by a landlord doing a pre-move-out inspection. They have a flashlight and they know what a patch looks like. The trick isn't to hide the patches — it's to do them well enough that they genuinely match the ceiling.
If you're leaving within the next 3-6 months, walk the apartment with a flashlight held against the ceiling. Every shadow from a small bump is a potential deposit deduction. Touch up those patches now while you still have the paint and time.
For a deeper dive into the kinds of wall and ceiling repairs that show up at move-out — and how to avoid getting charged for things you didn't cause — the guide to hanging things without damage covers the anchor side of the same problem. And if your repair turns into something bigger than expected, the ceiling joist guide explains why some patches fail when there's nothing solid to anchor to.
The Bottom Line (Deposit Edition)
This kind of repair is the most common drywall job a renter faces, and the fix scales cleanly: spackle dab for tiny holes, two-coat spackle for anchor and screw holes, self-adhesive patch for anything up to 2 inches. The materials run $5-$15 total. The time is 30-60 minutes per hole, mostly drying.
What separates a patch that disappears from one that draws a flashlight beam like a pothole is the boring stuff: primer, multiple thin coats, waiting longer than the label says, feathering the edges. None of it is hard. None of it takes more than ten minutes. But skipping any one of them is how a $5 repair turns into a $100 deposit deduction.
I know because I've been on both sides of it. The patches that held for four years weren't the result of better skill — I just finally stopped rushing. Do the boring steps, wait the extra hour, and your ceiling will look like nothing ever happened. That's the whole game. The landlord walks through with a flashlight and sees nothing. You get your deposit back. That's the win.


Discussion (0)
Sign in to join the discussion