

Two winters ago I found a hairline crack above my door. Cracks in walls and ceilings aren't all the same — some need a pro within 24 hours, and some you can monitor with a Post-it note for a year. I panicked over a paint shrinkage fissure, then ignored one that mattered. Here's the 30-second paper test I wish someone had told me first.
I called a contractor for my door-frame line. He charged me $180 for a 15-minute look and told me it was paint shrinkage. I could have used a sheet of paper and a Sharpie to figure that out myself.
Most cracks in walls and ceilings are cosmetic, a small number are urgent, and there's a 30-second test you can run to tell which is which. This guide walks through the four warning signs that mean call a pro, the three you can safely watch, and the exact trick I use now when I see a new one. If you want to anchor heavy things near these areas later, check the drywall anchor types first so you don't make a small opening bigger.
The 4 Cracks You Should Never Ignore
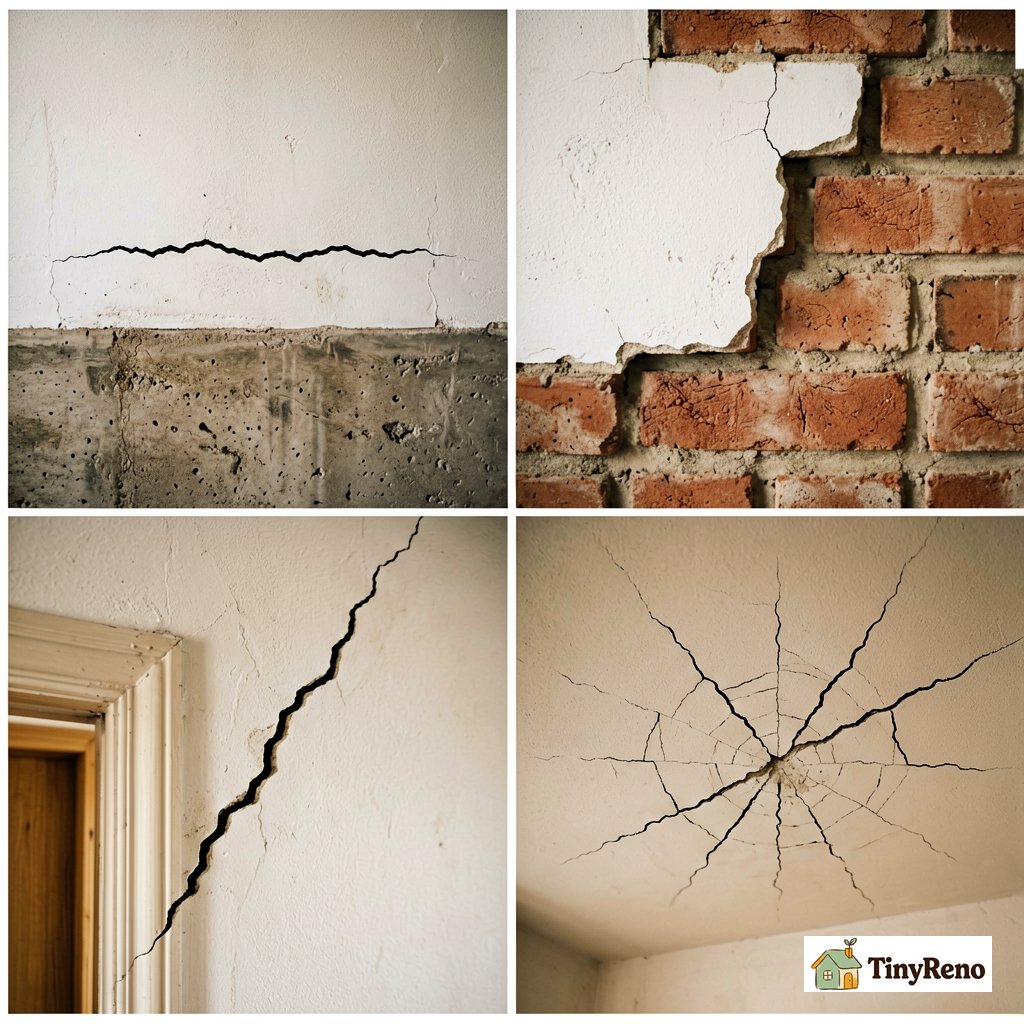
Some wall fissures aren't a question of "if" they'll get worse, but "when." These four patterns are the ones structural engineers and seasoned contractors flag immediately. If you see one, skip the wait-and-see and call a pro today.
- Horizontal fissures in basement walls. These usually mean hydrostatic pressure is pushing the wall inward. In a 1940s walk-up I rented, my downstairs neighbor found a 3-foot horizontal line along the foundation after a wet spring. The contractor confirmed: it was a bowing wall, not a paint problem. Left alone for another season, it would have needed $14,000 of structural reinforcement.
- Stair-step fissures in brick or concrete block. These follow the mortar joints in a staircase pattern. They mean the foundation is settling unevenly. A friend in a 1920s brownstone ignored hers for six months; the door wouldn't latch by month seven.
- 45° fissures extending from door or window corners. When the crack climbs at an angle from the top corner of a door frame toward the ceiling, that's a classic sign of stress concentration around the opening, often due to differential foundation settlement (one part of the house settling faster than another). A pro can tap-test the framing in 90 seconds to assess the severity. While rare, seasonal humidity changes can cause minor drywall cracks, but a true 45° structural crack will be wider at one end and taper at the other.
- Radial or "spiderweb" fissures in the middle of a ceiling. These start at one point and fan outward. Common causes include old joint compound losing adhesion or "truss uplift" — where wooden roof trusses expand and contract with temperature changes, pulling the ceiling away from the walls. Less commonly, it means the ceiling joist above is overloaded or cracked. A telltale sign of truss uplift is a crack that runs along the entire perimeter of the room where the ceiling meets the wall, especially noticeable in winter. The next time you change a light fixture in that spot, look up into the hole — if the wood is cracked, you have a structural answer.
The 3 Cracks You Can Watch and Wait
Every guide tells you to "monitor" hairline fissures. They almost never tell you which ones actually deserve monitoring, and which you should ignore entirely. The ceiling-vs-walls order matters here — ceilings are less forgiving than walls, and a fissure's location changes everything. After my $180 lesson, here's the list I'd actually watch:
| Crack Type | What It Looks Like | Safe to Watch? |
|---|---|---|
| Hairline vertical wall fissure | Thin, straight up-down, under 1/8" wide | Yes — paint shrinkage or settling |
| Fissures at nail/screw heads | Small starbursts around fasteners in drywall | Yes — fastener popped, re-set and patch |
| Seasonal seams between old and new construction | Thin line where an addition meets the original wall | Yes — expected movement, re-caulk annually |
Important caveat for vertical fissures: while generally safe to monitor, a hairline vertical fissure wider than 1/8 inch (3mm) or growing more than 1/16 inch (1.5mm) over a 6-month period warrants a professional evaluation, regardless of its orientation. Use the paper test to track growth accurately.
The reverse rule most guides won't tell you: if the fissure hasn't grown in 6 months and isn't near plumbing, leave it alone. Filling a stable fissure with rigid spackle can actually make things worse — you'll create a new one 3 inches away next season when the wall moves. Most cracks in walls and ceilings you see in an older apartment fall into this watch-and-wait bucket.
The 30-Second Test Before You Call a Pro
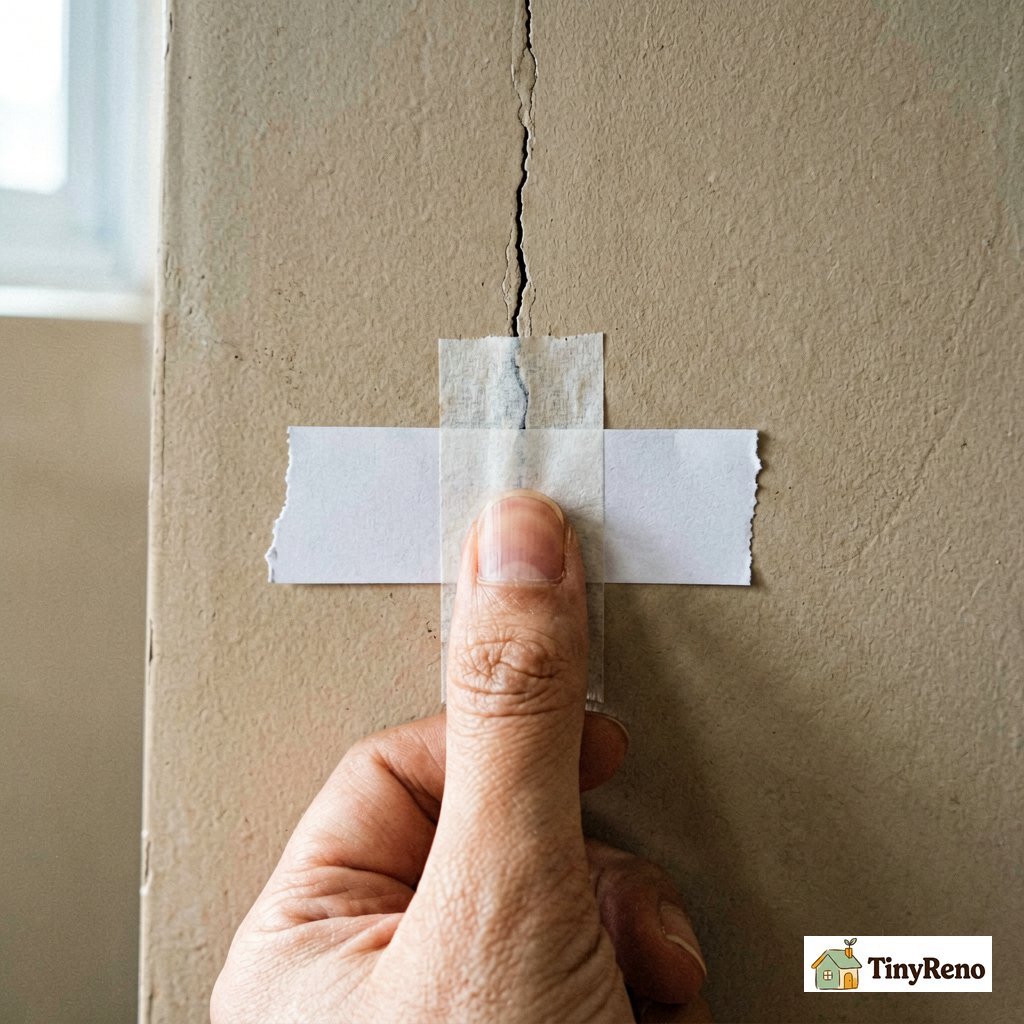
When I see a new fissure now, I run three quick checks before deciding. Total time: under a minute. These don't replace a structural engineer for the big stuff, but they tell me whether I should call one tonight or wait six months. Run them on any cracks in walls and ceilings you find, not just the one that scared you.
- The press test. Gently press your thumb or fingertips on either side of the fissure. Avoid pressing hard, especially near suspected structural areas. If the wall feels spongy, gives way slightly, or you hear a hollow sound different from the surrounding area, stop and call a pro. Solid wall + no movement = keep going.
- The paper test. Tape a small piece of paper across the fissure, write the date on it, and photograph it. Pro tip: use a thin, semi-transparent piece of printer paper. If the crack shifts, the paper will not only tear but may also show a subtle bulge or distortion when held up to light, making tiny changes easier to spot. Check it in 2 weeks. If the paper is torn or stretched, the wall is moving. If it's still flat, the fissure is stable. This is the test I should have run two winters ago.
- The moisture test. Run your hand along the wall on either side. Cool, damp spots mean water intrusion — not a settling issue. Joint compound dry time and water damage are different repair tracks entirely, and water means you also need to look up: a leak on the floor below often shows as a fissure on the wall above. If moisture is involved, the kind of fissure matters less than the source.
Once you've run these three, you'll know which category you're in. Most renters never do this test and end up paying $150+ for a contractor to run it for them.
DIY crack gauge: don't have a professional crack width gauge? Print a "crack comparison card" from online — many structural engineering sites offer free PDFs. Tape it next to the fissure and photograph it monthly. This gives you a consistent visual reference for tracking width changes over time, the same way contractors do it on-site.
What I Did Differently This Time
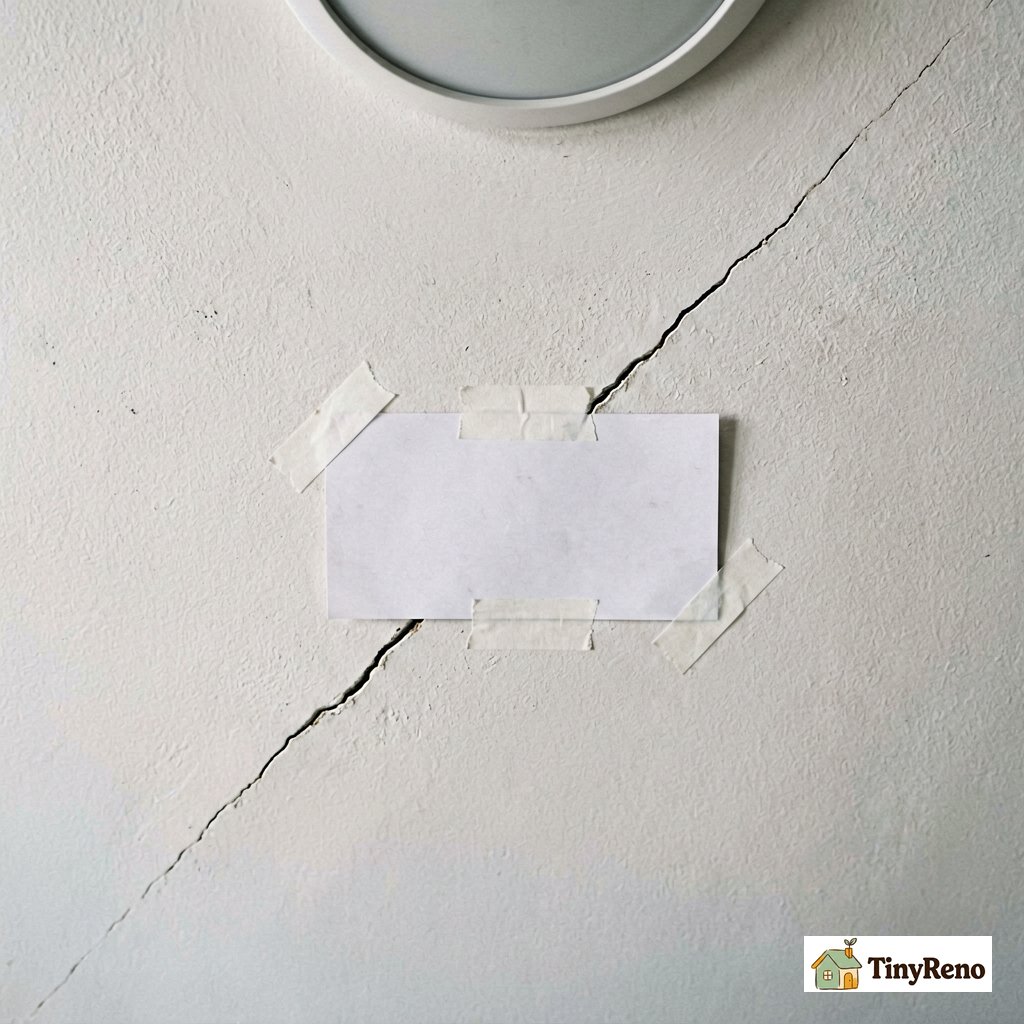
Last spring, my upstairs neighbor texted me a photo: a horizontal fissure running about 18 inches along the ceiling of her dining room. The kind that made my stomach drop. I went up with a flashlight, a sheet of paper, and painter's tape.
Here's what I checked: the press test (solid), the moisture test (dry, no musty smell), and the location (not running from a window or door corner — just along an interior ceiling seam). I taped the paper, we waited 14 days. The paper didn't move.
Two weeks later, we patched it together: wet-sanding small touch-ups with a damp sponge and pre-mixed joint compound, two thin coats 12 hours apart, prime with Zinsser B-I-N, then a single coat of ceiling paint. Total cost: $22. Total time: a Sunday afternoon. It's been 11 months and the paper is still taped there, still flat, still white.
The horizontal fissure above my own door? The contractor was right — paint shrinkage. The "fix" would have been $6 of spackle and an hour. I learned two things that year: a paper strip costs less than a contractor visit, and the cracks in walls and ceilings when to worry question is answerable in under a minute if you know what to check.
The 3 Cracks Your Insurance Might Actually Cover
If you're a renter, your landlord's insurance covers the structure. If you're an owner, your homeowner's policy covers damage from "perils" — sudden events. Most cracks in walls and ceilings don't qualify, but three do:
| Fissure Type | Insurance Status | What to Document |
|---|---|---|
| Sudden settling after a specific event (earthquake, nearby construction) | Usually covered if you can date it | Photos with timestamps + newspaper of event |
| Fissures with water stains (pipe burst, ice dam) | Often covered under "sudden water damage" | Photos + plumber's report + moisture meter reading |
| Damage from named perils (fire, storm, vehicle impact) | Covered | Police/fire report + photos |
The slow-settling trap: if a fissure grew over 5 years and you only just noticed it, most insurers call that "wear and tear" and deny it. Photograph any new fissure the day you spot it — even if you don't plan to claim. A 30-second photo now beats a denied claim later.
Whether you end up filing a claim or patching it yourself on a Sunday afternoon, the goal is the same: know which fissures deserve attention, and which ones you can leave alone. The paper test costs you 30 seconds and a piece of printer paper. The contractor visit costs you $150 and a day off work. Run the test first.


Discussion (0)
Sign in to join the discussion