

Repair ice makers is one of those appliance fixes where the parts are cheap, the diagnostic is straightforward, and the labor is minimal — but the industry has trained homeowners to think the whole unit needs replacing. My neighbor asked me to look at her ice maker last March because it had stopped making ice and she'd called a repair service that quoted her $650 to replace the whole unit. The service tech spent about ten minutes looking at it, declared the ice maker "beyond repair," and left. She was ready to pay when she mentioned it to me over the fence. I had it making ice again in forty minutes with a $25 water inlet valve.
Most people who set out to repair ice makers discover the parts are cheap, the diagnostic is straightforward, and the labor is minimal — but the industry has trained homeowners to think the whole unit needs replacing. The truth is that most "broken ice maker" calls resolve to one of five specific failures, and three of them are under $50 in parts with no special tools required. The fifth one is genuinely a replace-the-whole-thing situation, but you want to rule out the other four before committing to that.
If you've set out to repair ice makers yourself, the order to check matters because some failures look identical from outside the fridge but require completely different fixes. Replacing the wrong part is the most common reason homeowners give up and call a service tech — they tried something, it didn't work, and they assume the problem must be more serious than it is.
The 60-second check that tells you which of the five you're dealing with
Open the freezer. Pull out the ice bin. Look at the ice maker unit itself — the white or metal box hanging on the left side of the freezer wall. Listen for any sounds when you press the ice maker's test button (most have one; if yours doesn't, skip this step).
- If you hear a hum but no ice ejection, the motor is trying to run but the mechanism is jammed.
- If you hear nothing at all, no power is reaching the unit.
- If the ice maker fills with water but doesn't freeze, the freezer temperature is too high or the water line has a flow problem.
- If the ice maker makes ice but it tastes bad or smells off, the issue is the water filter or the supply line, not the ice maker.
The sound test is the single most useful diagnostic when you set out to repair ice makers. A working ice maker has a distinctive cycle: water fills the tray, the tray freezes, the heater warms the tray slightly, the motor rotates the tray, the ice cubes eject, the cycle repeats. If you can't hear any of that happening, the problem is electrical or mechanical, not temperature.
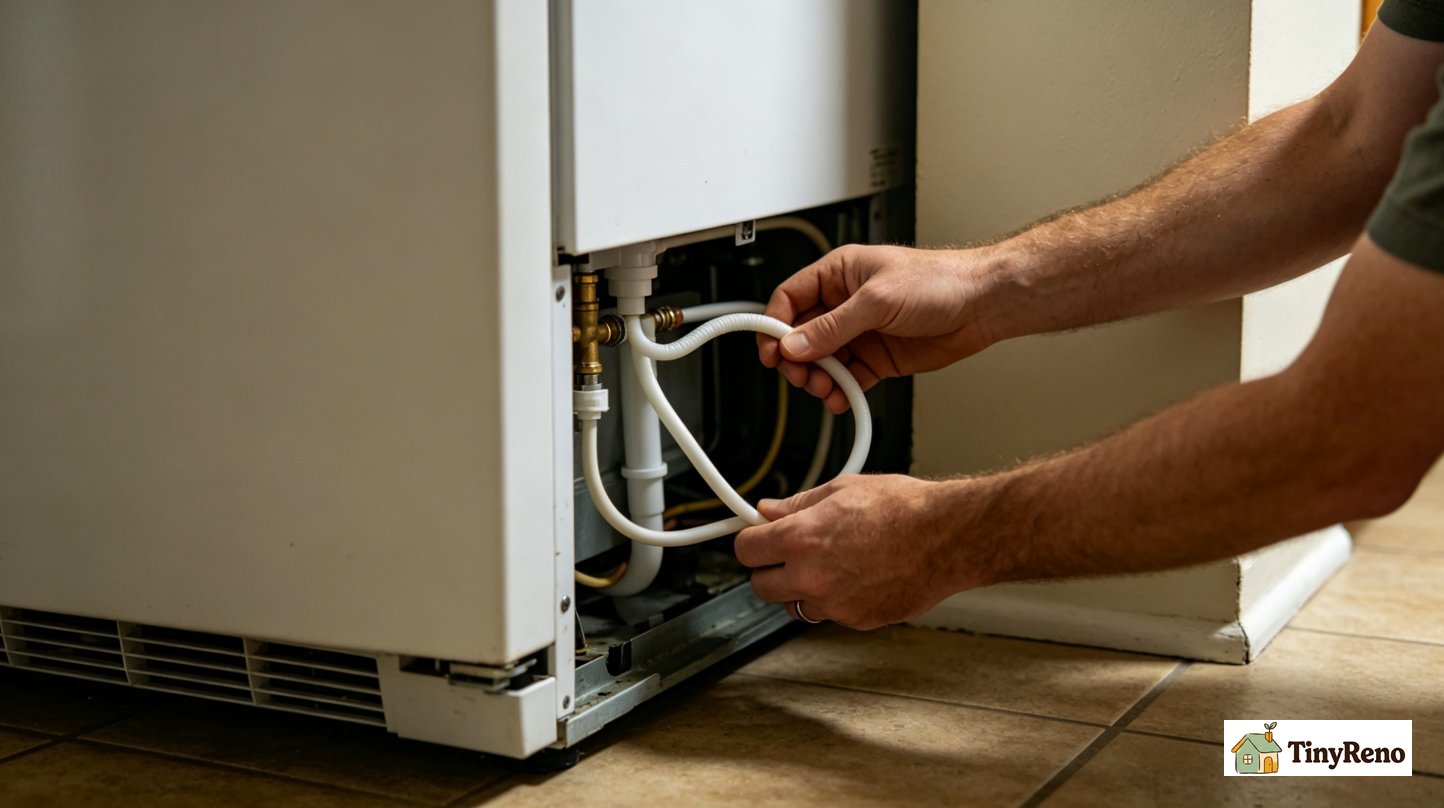
The water inlet valve has failed (most common, easiest to test)
The water inlet valve is an electrically-operated solenoid that opens when the ice maker calls for water and closes when the tray is full. It's mounted on the back of the fridge, usually near the bottom, where the 1/4-inch water supply line connects. The valve has two outputs: one to the ice maker, one to the water dispenser.
When the valve fails, it usually fails in one of two ways: it doesn't open at all (no water reaches the ice maker), or it doesn't close completely (water slowly drips into the ice maker, freezing into a solid block). Either failure leaves the ice maker unable to function properly.
The test is straightforward. Unplug the fridge first. Pull it out from the wall, find the valve, and put a cup under the ice maker's water outlet. Plug the fridge back in, then with the ice maker calling for water (either through its test cycle or by manually activating it), listen at the valve for a click. If you hear a click but no water flows, the valve is electrically working but mechanically stuck — replace it. If you hear no click, no power is reaching the valve; check the wiring and the ice maker's control board before replacing the valve.
Replacement valves are $20-40. The job takes about 20 minutes with a screwdriver and a wrench for the supply line. Don't forget to turn off the water supply at the saddle valve or shutoff before disconnecting anything.
The ice maker module itself has failed (the one the repair tech quoted you on)
The ice maker module is the control unit mounted on the front of the ice maker — the part with the test button, the motor, the heating element for ejection, and the optical or mechanical ice level sensor. When this fails, the entire unit is dead. No hum, no click, no water, no ice. The repair tech's instinct to quote replacement is correct for this specific failure.
Before swapping the module, test the power and signal at the module's connector with a multimeter. If power is reaching the module but it doesn't respond, the module is likely bad. If you buy a replacement, confirm the return policy first—most stores allow returns within 30 days if the part is unused and in original packaging.
Replacement modules are $100-250 depending on the brand. Generic "universal" modules exist for $50-80 but the fit and function aren't always reliable. For major brands (Whirlpool, GE, Frigidaire, Samsung), buy the OEM part. For off-brand or discontinued units, the universal module is your only option.
This is the failure that actually does justify the $650 quote from the repair service — if the module is bad and you replace the whole ice maker assembly to repair ice makers at the unit level, $650 is in the right range. But you want to be confident the module is the problem before paying that.
The water filter is clogged and restricting flow (the one homeowners don't think about)
If your fridge has a water filter (most modern ones do, either inside the fresh-food compartment or on the supply line behind the fridge), a clogged filter reduces water flow to the ice maker. The ice maker may still get some water, but not enough to fill the tray properly. The result is small, malformed ice cubes that freeze into a slushy mass rather than separate cubes.
The diagnostic is to bypass the filter and see if the ice maker starts working normally. Some filters have a bypass plug in the filter housing that lets water flow without filtering. Check your fridge manual—if you have one, use it to test. If not, simply replace the filter; they're inexpensive and the most likely culprit.
Replacement filters are $30-60 depending on the brand. The job takes about 5 minutes — twist out the old, twist in the new, run a few cups of water through the dispenser to clear the lines.
Most manufacturers recommend replacing the filter every 6 months regardless of symptoms. If yours is overdue, swap it before doing any other diagnostic. A $30 filter swap that fixes the problem is the cheapest possible repair.
The freezer temperature is too high for the ice maker to work (the one that needs a thermometer)
Ice makers need the freezer to hold a steady 0-5°F to make ice properly. If the freezer temperature drifts above 10°F, ice production slows and cubes may come out small or slushy. Above 15°F, the ice maker usually stops altogether. The ice maker thinks something is wrong (because the ice hasn't ejected), runs through its diagnostic, and shuts down until the next call for ice.
The diagnostic requires a freezer thermometer. They're $5 at any hardware store. Put it in the freezer for 24 hours, then check the reading. If it's above 10°F, your freezer is too warm to make ice reliably, and fixing that is the real repair — not the ice maker itself.
The most common cause of a warm freezer with a working compressor is a failed door seal. Run your hand along the seal while the door is closed — you should feel resistance. If air leaks through, the seal has hardened and needs replacement. Door seals are $30-80 and snap into place.
The second most common cause is the evaporator fan problem I described in another article. If the fan isn't running, the freezer compartment gets cold enough at the back (where the coils are) but not at the front (where the ice maker is). The thermometer reading depends on where you put it.
The water supply line is kinked or frozen (the one behind the fridge)
The 1/4-inch water line that runs from your house plumbing to the back of the fridge can kink if the fridge is pushed too far against the wall. It can also freeze in extremely cold installations (a garage fridge in an unheated garage, for example). Either failure restricts water flow to the ice maker.
The diagnostic is to pull the fridge out and inspect the line. Look for sharp bends, crushed sections, or ice buildup on the line. If you find a kink, straighten it carefully — copper lines can kink permanently if you bend them too far. If the line is plastic (most modern installs), it can usually be straightened without damage.
If the line is frozen, the fix is to thaw it. A hair dryer on low works, or you can wrap the line in warm towels. Once thawed, insulate the line so it doesn't refreeze. Foam pipe insulation from the hardware store, $3 for 6 feet, is enough to protect most installations.
Also check the saddle valve or supply shutoff. These small valves can wear out and restrict flow without fully closing. If you've replaced everything else and the ice maker still gets low water flow, replace the supply valve. They're $10-15 and the job takes 20 minutes with the main water shut off.


Discussion (0)
Sign in to join the discussion